A member of a Discord server I moderate was curious about how to roll a tetrahedron. And that intrigued me. It’s such a unique problem. They wanted something similar to Tarodev’s “Roll-A-Cube” video.
Searching for a pre-existing solution to see if this had been done before turned up nothing. So I got to work. Engineering a solution to a unique problem involves trial and error, and I’ve purposefully included any non-working attempts so that you can follow along with the process.
For my initial approach, I’ll try modifying the Roll-A-Cube code, which uses the RotateAround method.
But before we get to that, we’ll need a 3D model to work with.
# 3D Tetrahedron Model
The requirements I set for myself were the following:
- Edge length of 1 unit (a.k.a. “unit tetrahedron”).
- Bottom face is level with the XZ-plane (y = 0).*
- Top vertex is centered directly above the origin.
- Pointy end forward (though this can easily also point right, not a hard-set constraint).
- Precision is important so I can’t rely on downloading someone else’s model.
*Note: This was just for easier math; we will offset it later so the center is at the origin.
With this setup, I did the math (I will leave the fun of trigonometric computations to the reader) and came out with the following 4 vertices:
| |
All 4 vertices are 1 unit away from each other and sqrt(3/8) units away from the center:
| |
If you want to try deriving it for yourself, I also recommend a linear algebra approach by setting up a few system of equations to solve for the unknowns. Alternatively, you can check out the Tetrahedron Wikipedia page for examples, and apply your desired scaling and offset.
With these 4 vertices, we can now create our mesh. How you choose to do this is up to you:
- 3D Modeling Software (i.e. Blender) - Benefits are: easier customizations like smoothing edges, UV/Texture maps, etc.
- ProBuilder in Unity - New Shape > Cone > Radius = 0.5773503, Height = 0.8164966, Sides = 3.
Note: This didn’t feel as accurate and will require modified code to work with later because it’s not a regular
Meshbut aProBuilderMesh. - Generate Mesh via code - I’ve created a script to generate it for you in one click. I purposefully offset the mesh vertices down so that the center is at the origin. This makes it easier for rotating.
Once you have the mesh generated, it’s time to set up the GameObject structure. It’s generally a good practice to keep the visuals separate from the logic. We’ll classify the rotation as part of the visuals, but the movement still needs to be applied to the root object. Set it up with the mesh as a child object, then gave the child’s local position the appropriate y-offset.
# RotateAround Approach
Transform.RotateAround requires 3 pieces of information:
- A
Vector3axis to rotate around - A
Vector3point, a world-space anchor, for which the axis passes through - A
floatangle of rotation in degrees
We need to access the world positions of the vertices to get the axis and point to rotate around.
If you were to access the vertex info from the MeshRenderer’s Mesh data, they would be returned as local offsets.
They can be converted to world coordinates with transform.TransformPoint(vertexOffset).
Alternatively, we can add 4 Transforms as children, use vertex-snapping (by holding v) to position them, and add them to a List<Transform> _vertices, which is what I’ll use for this example.
Since we’re just prototyping for a proof-of-concept at this stage, quick iteration is more important than performance, so we can do a quick-and-dirty Linq statement:
| |
Finally, we’ll need the angle of rotation. For a cube, it’s an easy 90°. But for a tetrahedron, it’s a bit harder to calculate.
Spoiler alert: it’s 109.4712206..°, or acos(-1/3). According to the wiki page, this is the same as the “Vertex-Center-Vertex” angle.
However, I initially solved it for the angle between two faces, also known as the “dihedral angle”, then subtracted that from 180°.
# RotateAround Results
So this will work. If performance is a concern, replace Linq with something that doesn’t generate garbage. If you’re happy with those results, you can stop reading here, grab the complete script, and enjoy the rest of your day. 🎊
But it does have some limitations to be aware of:
- Over a long distance, after many rolls, some error will accumulate and the orientation won’t be perfectly flush. This is because the angle of rotation is an irrational number, and there will be floating point errors.
- It’s not very easy to apply an easing function to alter the feel of the roll with RotateAround.
With those limitations in mind, what are some other potential ways to rotate a tetrahedron?
- Rigidbody & AddTorque - physics isn’t always reliable; we want more control over how it moves. ❌
- Hard-code all 6 possible orientations and their transitions - too inflexible, feels hacky, lots of work. ❌
- Get target rotations procedurally with raycasts and use quaternions - seems promising, let’s try it! ✔️
# Procedural Approach
The main issue we want to avoid from before is compounding errors. Every rotation should be independent and absolute. Meaning: if one rotation under- or over-shoots, the next should have a definitive target so that errors don’t add up. Previously, RotateAround handled both rotation and movement, so we’ll need to handle the movement part separately.
Here’s the plan:
- The input direction will be used for a raycast to hit 1 of the faces.
- We’ll use the normal of the triangle to loosely represent an orientation (no need to keep track of vertices anymore).
- That face should end up on the bottom, where its normal will point down, so we calculate the required rotation to make that happen.
- And then we’ll figure out movement later.
# Determining the Rotation
If we want to hit the correct face from the outside with a raycast, we’ll want to use a LayerMask to avoid other objects potentially intercepting that ray. Or… now hear me out… we start our raycast from the inside. By default, raycasts won’t hit the back-side of triangle faces. We can solve that in one of two ways: recreate the mesh so that the fronts of the triangles are visible from the inside (i.e. make it double-sided), or simply enable it with:
| |
I’m choosing this simpler option.
Side note: if you ever want to add a Rigidbody, Unity complains that the mesh isn’t “convex”. And if you tick the Convex checkbox on the Mesh Collider, the raycasts won’t detect the back faces for some reason.
Pop Quiz
When you get a RaycastHit result from inside of a tetrahedron (i.e. hitting the backface) and read the hit.normal, which direction does the normal vector point: inward or outward?
Answer: It’s outward still. The normal for the face hasn't changed.If you’re unfamiliar with Quaternions, check out my other post explaining them! For now just know they represent rotations and/or orientations. They can interpolate more accurately than using Euler angles, always taking the shortest path, and aren’t subject to gimbal lock.
With the goal to rotate so that the hit face ends up on the bottom, we can get the target orientation with the following code:
| |
Note: The order of multiplying quaternions together matters. The left-hand-side will be applied to the right-hand-side.
# Determining the Movement
To figure out how far we need to move, that’s just twice the distance from the center of an equilateral triangle to the middle of an edge.
The total distance is 1/sqrt(3), so we can make that a variable:
| |
To get the direction, we can use the normal again and just zero-out the y-component and normalize it:
| |
The end position after a full rotation will be:
| |
It’s worth mentioning that there is still a chance for some positional error accumulation.
If you have a very large map where the position needs to be accurate to a grid, you’ll want to grab the coordinates from the grid cell instead.
You can set up your own coordinate system or just raycast the ground triangle and cleverly use hit.barycentricCoordinate.
But this will work for our purposes without over-engineering.
# Interpolating/Tweening
Now that we have figured out our targets for rotation and movement, we need to interpolate. There are many options to achieve this:
- Your choice of tweening library if they support quaternion rotations
- Create a coroutine utilizing any of the following
- Lerp
- Slerp
- RotateTowards / MoveTowards
Since we’re still prototyping, I will start out with DOTween. It’s basically a coroutine without having to write all of the boilerplate, and it’s free from the asset store.
# DOTween
Rotating is as simple as calling this one line:
| |
Note: DOTween suggests to use DORotate, but don’t; that method uses euler angles and we know how that turns out.
We also need to move our object up then down smoothly as it moves. Fortunately, DOTween has our back with:
| |
After tweaking the _jumpPower to stay in contact with the ground, a value of ⅙ was good enough: 0.166f
It looks promising! However… there’s one small detail that I don’t like…
It doesn’t stay anchored.
Why doesn't it stay anchored?
We need the path of the jump to be circular, since it just goes along a 109.47..° arc of a circle. And the shape of the path for DOJump is likely to be parabolic (or something that isn't circular). We don't have control over the underlying code behind DOJump to adjust its path, and it cannot be fixed by just using a different Ease either.So we can't use DOJump.
What's my proposed solution?
We could use some combination of DOMove, DOLocalMoveY, or some other DOTween method to create the right path, but I have a better idea in mind. Looking at our options for interpolating, one of them stands out in particular to work with circular (spherical) rotations: Slerp.Time to write our own coroutine.
# Coroutine with Slerp
The rotation in the coroutine also requires that we first cache the start so that we can properly Slerp between the start and target.
| |
If you’ve never used Vector3.Slerp before, think of it like a windshield wiper. A vector gets rotated from pointing in one direction to pointing in another.
With that in mind, we need to mainly work with offsets, which we then add onto a world position reference point - an anchor.
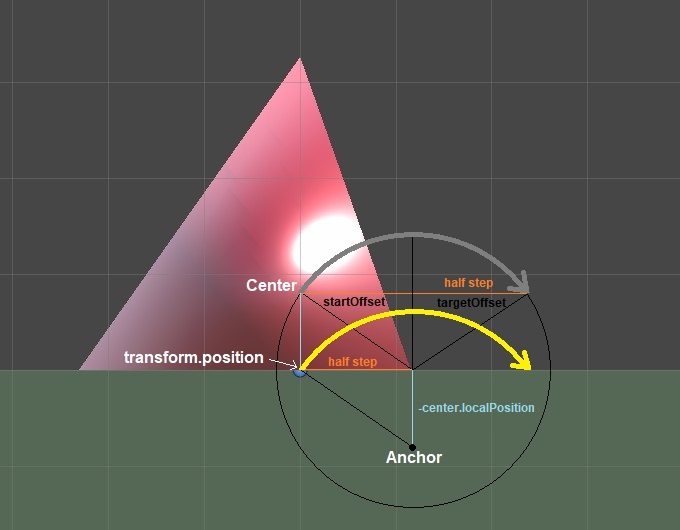
In this diagram, the Slerp operation would move a vector along a circular path, depicted by the gray arrow.
To achieve moving the parent (transform.position) along the yellow curved path, this is the relevant parts of the movement code:
| |
And that’s it! With this approach, it’s very easy to add an AnimationCurve for a custom easing function and it doesn’t rely on a third-party asset.
You can grab the complete script here.
Happy rolling!